Posts tonen met het label China Glaze. Alle posts tonen

15-03-2011

NOTD: China Glaze Harmony

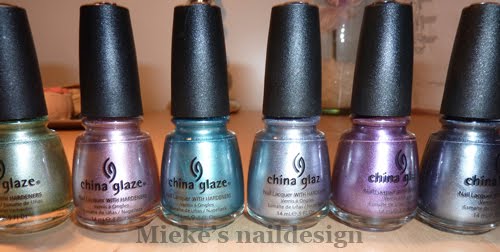
Zoals ik al eerder schreef heb ik vorige week mijn eerste bestelling via eBay binnengekregen! De inhoud: 6 lakjes van China Glaze uit de Romantique collectie. Op andere blogs werd er veelal lovend over de lakken gesproken, o.a. omdat ze erg goed gebruikt kunnen worden voor stamping. Ideaal dus, aangezien ik hier een groot fan van ben.
De 6 lakjes die ik heb gekocht:

The 6 polishes I bought are, from left to right:
Cherish, Admire, Adore, Devotion, Harmony and Awaken

As I mentioned before, my first order on eBay arrived last week. It contained 6 polishes from the China Glaze Romantique collection. On other blogs these polishes where highly recommended, one reason was that these polished are excellent for stamping purposes. As I’m a big fan of stamping, this seems to be ideal. 

The 6 polishes I bought are showed in the picture above.

Vandaag ga ik jullie een swatch laten zien van het lakje Harmony. Harmony is een lila/paarse lak. Op de foto’s heb ik 2 lagen gebruikt. Het lakje droogde vrij snel, wat zowel een voordeel als een nadeel is. Je moet namelijk vrij snel lakken, om oneffenheden te voorkomen.
Zelf ben ik helemaal weg van dit lakje!! De kleur is gewoon helemaal te gek, in het echt nog mooier dan op de foto’s :). De kleur komt trouwens het dichtst in de buurt van foto 1. Op de één of andere manier veranderde de kleur iedere keer als ik een nieuwe foto nam...

Fig.1: Made with natural light (cloudy)

Fig.2: Made with artificial light

Today I will show you a swatch of the polish Harmony. Harmony is a lilac/ purple polish. I used 2 layers of nail polish to cover my nails in the pictures. The polish dries quickly, which is both an advantage as an disadvantage. To prevent irregularities, you have to work very quick. I’m totally in love with this polish. The color looks even better in real person than in the pictures, and is absolutely awesome :). Btw, the color looks in real the most like fig.1. For some reason, every time I took a picture, the color changed a little bit...

Fig.3: Made with natural light (sunlight)

09-03-2011

French mani meets Adore

Jaah!! Eindelijk weer een blogpost online. Shame on me :$.. Vorige week heb ik als laatste een stukje geschreven over het gebruik van de French liner van Herôme. De dag na het stuk vond ik mijn French manicure al behoorlijk saai, en besloot hem gelijk ook maar op te pimpen. Nu, een week later, staan de foto’s nog steeds op mijn computer te wachten om online te gaan.

Yesss!! Finally a new blog post online. Shame on me :$.. Last week I wrote about how to use the French liner from Herôme. The day after my post, I already found my French manicure pretty boring, so I decided to pimp it up. Now, a week later, the pictures of the result are still waiting on my computer to be published.

Om deze French manicure wat leuker te maken heb ik dit keer imageplate BM20 gebruikt. Op deze imageplate staan full nail stamping patronen.
Tenminste, dat zouden ze moeten zijn. Mijn nagels zijn namelijk vaak net te lang voor de patronen. Dit kwam nu mooi uit. Ik heb het patroon namelijk nu zo gestempeld dat hij net onder de tips van mijn nagels blijft. De lak die ik gebruikt heb om te stempelen is ‘Adore’ van China Glaze (jaja één van mijn nieuwe lakjes uit de Romantique collectie!).

To make this French manicure more attractive, I used image plate BM20. Full nail stamping patterns can be found on this image plate. However, I experienced that my nails are most of the time too long for the patterns. For this manicure I didn’t want to stamp over the tips of my nails, so this time that wasn’t a problem. The polish I used to stamp is ‘Adore’ from China Glaze (yess this is one of my new polishes from the Romantique collection!).

Het resultaat kunnen jullie zien in de foto’s hieronder.
You can see the result in the pictures below.


Made with artificial light
Made with natural light (too bad the sun wasn't shining)

23-02-2011

Marbled nails, love it or…..

Vandaag wil ik jullie mijn eerste poging tot marblen tonen. Ik had het al een paar keer voorbij zien komen op andere blogs, en vond het eindresultaat er vaak erg mooi uitzien. Dus tijd om zelf een poging te wagen.

Today I will show you my first attempt to marble. I’ve seen this type of polishing the first time on some other blogs. The end result always looked awesome. So, time to try this by myself.

Wat heb ik gebruikt om te marblen?
Een bakje/bekertje met water.
2 kleuren nagellak van China Glaze:
                - Midnight Kiss
                - Mommy Kissing Santa
Een satéprikker
En een heleboel tissues, wattenstaafjes en nagellakremover!

What did I use to marble?
A cup of water.
2 colors of nail polish from China Glaze:
               - Midnight Kiss
               - Mommy Kissing Santa
A toothpick
And at last a lot of tissues, cotton swabs and nail polish remover!


Marbled nails maak je door nagellak in een bakje met water te druppelen. Door 2 kleuren (meer kleuren kan natuurlijk ook) om en om te druppelen in het midden van het bakje, onstaan er kringen. Met deze kringen kan je leuke patronen maken met behulp van een satéprikker.


You can make marbled nails by dripping nail polish in a cup of water. By putting a drip of each color ( you can also use more colors) in the middle of the cup, you create circles of nail polish.
By using a toothpick, you can make funny patterns with these circles.


Wat ik zelf het lastigste vond, was überhaupt het krijgen van de kringen. Als je water namelijk niet helemaal op kamertemperatuur is, wordt de lak gelijk hard en drijft het als een soort vlies op het water. Op blogs wordt ook wel de tip gegeven om Spa blauw te gebruiken in plaats van kraanwater. Omdat het mij al vrij snel lukte met normaal kraanwater heb ik deze tip niet uitgeprobeerd.

I found it really hard to create the circles. When the water isn’t totally at room temperature, the nail polish hardens out instantly. When this happens, you can’t use it for marbling anymore. On a couple of blogs, there’s a tip for this: using mineral water that’s coming out of a bottle instead of ordinary tap water. Because marbling with normal water went pretty smooth, I didn’t test this suggestion.

Toen ik een patroon af had heb ik mijn vinger  horizontaal op het patroon laten zakken. Met de satéprikker heb ik toen het restant van de nagellak wat nog op het water dreef zoveel mogelijk weggeveegd. Dit terwijl ik mijn nagel nog in het water hield. Daarna heb ik hetzelfde gedaan bij mijn andere vingers.

When I completed my pattern, I dropped my finger horizontal in the pattern. With the toothpick I removed most of the nail polish that was still floating on the water. During this, I still held my finger in the water. After the nail polish was attached to my nail, I did the same with my other fingers.


Zoals jullie hieronder zien is het mij nog niet gelukt om dezelfde patronen te krijgen, maar oefening baart kunst!
Als laatste heb ik nog een tip. Ik was namelijk zo eigenwijs om mijn vinger niet af te plakken, met als resultaat dat mijn hele vinger onder de nagellak zat! Zelfs na flink bezig te zijn geweest met nagellakremover zie je nog overal resten/glitters van het nagellak zitten! Dus toch maar afplakken de volgende keer.

As you can see on the pictures, I didn’t succeed in making the same pattern on all of my nails. But with some practice, I’ll hopefully do better next time. At last I have a tip for you guys. I was a little bit stubborn by not taping of my finger, resulting that my whole finger had nail polish everywhere. Even when I cleaned my fingers with a lot of nail polish remover, you can still see some polish and glitter on my fingers. So next time I’m definitely gonna tape first.


Voor een eerste keer vind ik mijn marbled nails in ieder geval goed gelukt! Wat vinden jullie? En hebben jullie zelf al wel eens gemarbled?
For a first attempt I think my marbled nails are pretty good looking ;)! What do you think? And has anyone of you already tried marbling?

22-02-2011

Outta control..!!

Vandaag laat ik jullie een lakje zien waar ik echt helemaal verliefd op ben geworden! Het lakje heet: “Outta control” en is van het merk Teeez. Een naar mijn idee vrij onbekend merk. Het lakje is te verkrijgen bij een aantal filialen van de Da of Etos. Helaas hebben niet alle filialen het merk al, maar hopelijk komt dat nog! Op teeez.eu kun je zien waar bij jou in de buurt de lakjes te krijgen zijn. De lakjes zijn €4,50 per stuk.

Today I will show you a polish which I've become totally in love with! The polish is called "Outta Control" and is from the brand Teeez. I believe it’s a relatively unknown brand (at least I never heard of it before). Teeez is available in a number of DA or Etos stores (these are Dutch stores). On teeez.eu you can see where in your area you can get this polishes. The polishes are € 4.50 each.

Outta control is een paars/lila holografisch lakje. Het lakje smeert super. Op onderstaande foto heb ik 2 lagen gebruikt en dit dekt prima.

Outta Control is a purple / lilac holographic polish. It lubricates great. On the picture below I used two layers and it covers well.


Eigenlijk vond ik het zonde om nog iets toe te voegen aan dit lakje, want gewoon ‘nude’ is hij al super! Uiteindelijk heb ik ervoor gekozen om met Make An Entrance van China Glaze mijn nagels wat verder op te pimpen. Om het geheel af te maken heb ik nog een zwart lijntje getrokken tussen beide kleuren, met onderstaande foto als resultaat!

At first I thought it was a shame to add anything to this polish, just as it’s 'nude' already great! But then, without trying will never know if it’s a shame :). I chose to use ‘Make An Entrance’ from China Glaze to pimp my nails even more. To complete this look I added a black line between the two colors, resulting in the picture below!


Naast Outta control heb ik ook nog de lakjes Smooth en Cool gekocht van Teeez. Zouden jullie hiervan ook graag een swatch en/of nail-art willen zien? Let me know!

Besides Outta Control I also bought the polishes Smooth and Cool from the brand Teeez. Would you also like to see a swatch and / or nail-art of these polishes? Let me know!

21-02-2011

China Glaze Sci-Fi with nailart

Vandaag laat ik jullie een nail-art creatie zien met als basis Sci-Fi van China Glaze uit de Khrome collectie. Het is alweer een tijdje geleden dat ik deze nail-art had gemaakt, en ik twijfelde of ik hem zou showen omdat de foto's niet zo scherp zijn geworden.

Today I will show you a nail-art creation with as base Sci-Fi of China Glaze. This polish is from the Khrome collection. It has been a while since I made this look, and I wasn’t sure to show it to you guys, because the pictures aren’t that sharp.

Het lakje Sci-Fi van China Glaze smeert super en dekt al in 2 lagen. De kleur van de lak is erg apart, zilver met lichte lavendel tinten.
Na de basislaag heb ik mijn Konadplate M35 erbij gepakt om te stempelen met konad black. Omdat ik hierna het resultaat toch nog vrij somber vond, heb ik in iedere bloem een paars kristalletje geplaatst. Om het geheel daarna af te maken, heb ik mijn nail-art afgelakt met Yves Rocher Manucure Soin Blanchissant. Eigenlijk is deze lak bedoeld als basislak voor een manicure, maar ik gebruik hem zelf erg vaak als coating. Het lakje is namelijk niet helemaal neutraal, maar heeft een paarse gloed. Dit maakt het geheel bij deze nail-art compleet af, omdat het de lavendelkleur in het zilver versterkt. Jammer genoeg kan je dit niet zo goed zien op de foto's.


The polish Sci-Fi of China Glaze lubricates great and covers in 2 layers. The color of the polish is very special, some sort of silver with light lavender shades. After painting my nails with Sci-Fi, I took my Konadplate M35 and used the black Konad stamping polish to stamp. Because I found the result a little bit dark and boring, I put a purple rhinestone on top of each flower. To complete the look, I finished my nail-art with a coat of Yves Rocher Manucure Soin Blanchissant. Actually is this polish intended as a base coat for a manicure, but I use it very often as a coating. This polish (coating) isn’t entirely colorless, but has a purple glow. This purple glow makes the nail-art complete, because now you can see the lavender color even more in the silver. Unfortunately, you can’t see this very good in my pictures.


Al met al vind ik het een mooie art geworden!
Wat vinden jullie?

In the end I think it became a beautiful nail-art.
What do you think?